Oracle SODA for Python

Simple Oracle Document Access (SODA) set of APIs that allow you to create collection of documents in Oracle Database, so that later you can retrieve/query those documents. Using SODA implementation you can perform CRUD (create,read,update,delete) on documents. Document can be of any MIME type, in this blog we will focus on JSON.

There are separate SODA implementations available for languages like Java, Python, PL/SQL & C etc. however SODA for REST can be accessed from all those languages which support REST framework. Refer Oracle documentation for other implementation : Oracle SODA.

In this blog we will explore SODA for Python implementation. We will see how we can store/retrieve/filter JSON document in Oracle Database using Python. Oracle Database supports storing and querying JSON data natively.

Refer this blog for understanding JSON: What is JSON?


Prerequisite: Oracle Client 18.3 or higher, Oracle Database 18.1 or higher required for SODA. After that assign SODA_APP role to the database user in which you are going to create SODA collections.

-- Check client version using below query
SELECT distinct client_version
FROM v$session_connect_info
WHERE sid = SYS_CONTEXT('USERENV', 'SID');

-- Check database version using below query
SELECT * FROM v$version;
--or
SELECT * FROM v$instance; 
-- SODA grant
GRANT SODA_APP TO <DB-USER>;

I’m using Oracle 19c Database, Python3 & cx_Oracle version 8. SODA is part of Oracle Python module cx_Oracle no need to install any other module.

Other Python Module used: configparser, json & requests.


SODA Collection

Soda collection is nothing but a database table. Collections contains document which can be represent as row of database table. createCollection method create a new collection in database & if collection already exists its just open without error.

SodaDatabase.createCollection(name, metadata=None, mapMode=False)

Lets create one simple collection providing only name argument.

print('Starting session...')
try:
    dsn = cx_Oracle.makedsn(hostname, port, service_name=servicename)
    conn = cx_Oracle.connect(username,password,dsn,encoding=encoding)
    print('Connected:' + conn.version)

    soda = conn.getSodaDatabase()
    collection = soda.createCollection("first_collection")
    conn.close()
    print('connection closed...')
except cx_Oracle.Error as e:
    print('Error:', e)

Collection FIRST_COLLECTION i.e. created using Python code: See below objects created by default in the database: Table, Index & Object

Collection Metadata: ‘FIRST_COLLECTION’

As metadata argument is not specified at the time of collection creation. Hence by default Oracle created a collection that support JSON document only & uses system generated keys. You can also provide metadata at the time of collection creation: Refer soda-collection-metadata-components-reference.

See below “JSON_DOCUMENT” constraint added automatically. You cannot store non json document in this collection, it will raise exception.

Insert Documents

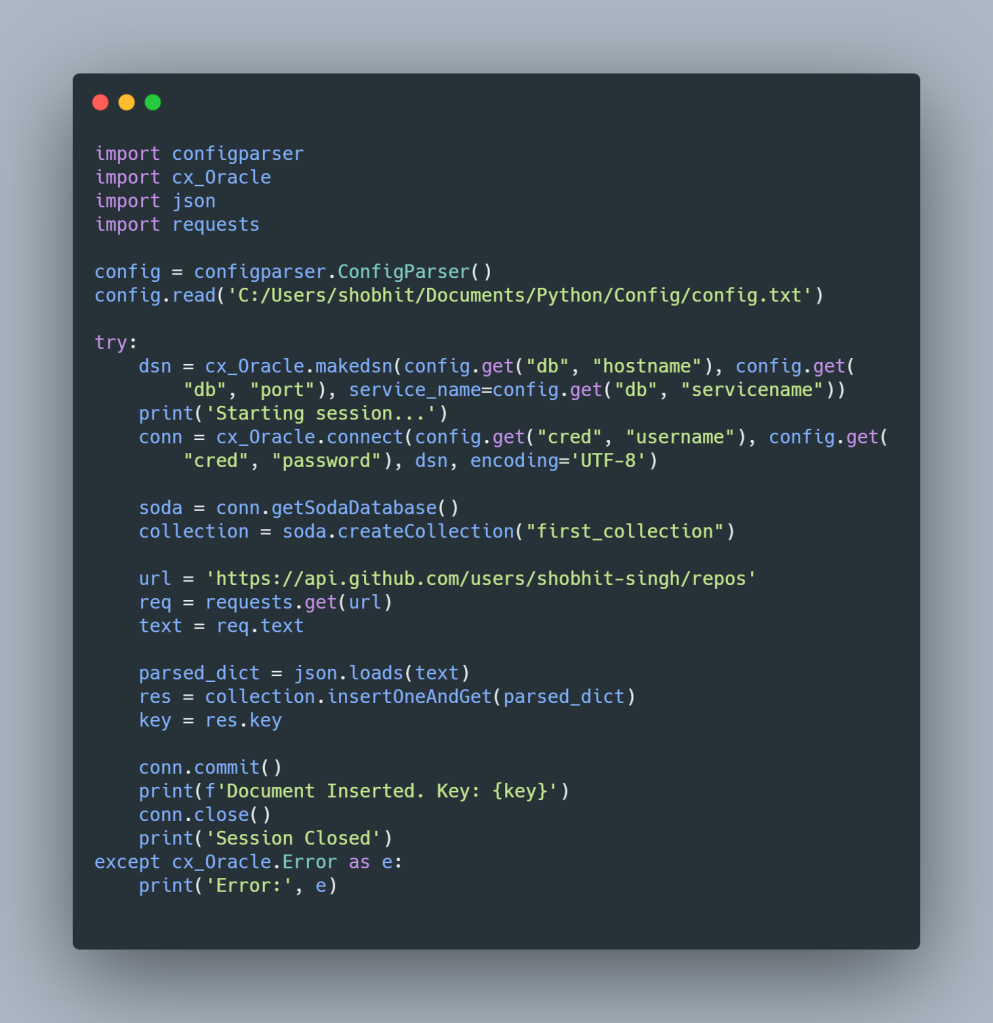
Let’s insert some JSON document in this collection “FIRST_COLLECTION”. Here we have used GitHub free API to fetch some JSON data using request module.

We will use insertOne method to insert document. Input argument must be a SODA document or a dictionary or list. Refer below how to create a SODA document.

print('Starting session...')
try:
    dsn = cx_Oracle.makedsn(hostname, port, service_name=servicename)
    conn = cx_Oracle.connect(username,password,dsn,encoding=encoding)
    print('Connected:' + conn.version)

    soda = conn.getSodaDatabase()
    collection = soda.createCollection("first_collection")

    url = 'https://api.github.com/users/shobhit-singh/repos'
    req = requests.get(url)
    text = req.text

    parsed_dict = json.loads(text)
    collection.insertOne(parsed_dict)

    conn.close()
    print('connection closed...')
except cx_Oracle.Error as e:
    print('Error:', e)

A document is created in the table FIRST_COLLECTION: Refer JSON_DOCUMENT column for JSON data.

Code snippet for inserting json document using file:

try:
    dsn = cx_Oracle.makedsn(hostname, port, service_name=servicename)
    conn = cx_Oracle.connect(username,password,dsn,encoding=encoding)
    print('Connected:' + conn.version)

    soda = conn.getSodaDatabase()
    collection = soda.createCollection("first_collection")

    with open('jsonndata.json') as f:
        data = json.load(f)

    collection.insertOne(data)
    conn.commit()
    conn.close()
    #print('connection closed...')
except cx_Oracle.Error as e:
    print('Error:', e)

There are other ways also by which you can insert document in collection. Like insertOneAndGet, insertMany etc. Refer api_manual/soda

Get Collection Names

To get all collection names present in database. Use getCollectionNames method:

print('Starting session...')
try:
    dsn = cx_Oracle.makedsn(hostname, port, service_name=servicename)
    conn = cx_Oracle.connect(username,password,dsn,encoding=encoding)
    print('Connected:' + conn.version)

    soda = conn.getSodaDatabase()
    name = soda.getCollectionNames(limit=5)
    print(name)

    conn.close()
    print('connection closed...')
except cx_Oracle.Error as e:
    print('Error:', e)
        

There are various method available for collections like drop collection, find, truncate etc. Refer this link for details : soda-collection-object

Printing metadata of collection
print('Starting session...')
try:
    dsn = cx_Oracle.makedsn(hostname, port, service_name=servicename)
    conn = cx_Oracle.connect(username,password,dsn,encoding=encoding)
    print('Connected:' + conn.version)

    soda = conn.getSodaDatabase()
    coll = soda.openCollection("git_repos")
    print(coll.metadata)

    conn.close()
    print('connection closed...')
except cx_Oracle.Error as e:
    print('Error:', e)
Get all documents inside a collection
print('Starting session...')
try:
    dsn = cx_Oracle.makedsn(hostname, port, service_name=servicename)
    conn = cx_Oracle.connect(username,password,dsn,encoding=encoding)
    print('Connected:' + conn.version)

    soda = conn.getSodaDatabase()
    coll = soda.openCollection("first_collection")
    doc = coll.find()
    print(doc.getDocuments())

    conn.close()
    print('connection closed...')
except cx_Oracle.Error as e:
    print('Error:', e)

Retrieving Data

Retrieve JSON data from the document. Let’s just print all GitHub repo names present in that JSON.

print('Starting session...')
try:
    dsn = cx_Oracle.makedsn(hostname, port, service_name=servicename)
    conn = cx_Oracle.connect(username,password,dsn,encoding=encoding)
    print('Connected:' + conn.version)

    soda = conn.getSodaDatabase()
    coll = soda.openCollection("first_collection")
    doc = coll.find()
    docs = doc.getDocuments()
    res = docs[0].getContent()

    for i in res:
        print (i["name"])

    # dumping complete data as json file
    json.dump(res, open ('data.json', 'w'), indent=4)

    conn.close()
    print('connection closed...')
except cx_Oracle.Error as e:
    print('Error:', e)
Filtering JSON documents data

Filter documents records in collection on the basis of some input dictionary or JSON string. Filter specification is also called a query-by-example (QBE).

Refer this guide for filter specification details. overview-soda-filter-specifications-qbes

try:
    dsn = cx_Oracle.makedsn(hostname, port, service_name=servicename)
    conn = cx_Oracle.connect(username,password,dsn,encoding=encoding)
    print('Connected:' + conn.version)

    soda = conn.getSodaDatabase()
    coll = soda.openCollection("first_collection")
    doc = coll.find()    
    docs = doc.filter({"Numbers": {"0": "Zero", "1": "One"}})
    #docs = doc.filter({"name": "BigDataEnthusiast"})

    print( 'Count' ,docs.count())
    print( 'Doc Key:' , docs.getDocuments())

    conn.close()
    print('connection closed...')
except cx_Oracle.Error as e:
    print('Error:', e)

There are so many method available for collections/documents. You can refer below mentioned cx_orale documentation for more learning.

Refer GitHub link all code used in blog: github.com/shobhit-singh/Python-Programs/tree/master/cx_oracle_soda

References:


Thanks!
Happy Learning! Your feedback would be appreciated!

PL/SQL Associative Array

  • Similar to hash tables in other programming languages. Dictionary in Python, like Key-Value pair.
  • Index-by tables, also known as associative arrays. Associative arrays are set of Key-Value pair.
  • Each key is unique & locate to use corresponding value in the array.
  • Key – String/PLS_Integer.  Value can be any PL/SQL datatype like Varchar2, Integer. (Check Oracle Documentation for restrictions if any )
  • It can be dense or sparse – i.e. no consecutive index order.
SET SERVEROUTPUT ON;
SET DEFINE OFF

DECLARE
        TYPE direction IS
        TABLE OF VARCHAR2(15) INDEX BY VARCHAR2(2);
    TYPE error_code IS
        TABLE OF VARCHAR2(100) INDEX BY PLS_INTEGER;

    TYPE state_info IS RECORD (
        state_code  CHAR(2),
        state_name  VARCHAR2(20)
    );
    TYPE states IS
        TABLE OF state_info INDEX BY PLS_INTEGER;
    lv_direction_dict   direction;
    lv_error_code_dict  error_code;
    lv_states           states;
    ln_index            VARCHAR2(2);
BEGIN
/* TABLE OF VARCHAR2(10) INDEX BY VARCHAR2(2) */
        lv_direction_dict('N') := 'North';
    lv_direction_dict('S') := 'South';
    lv_direction_dict('E') := 'East';
    lv_direction_dict('W') := 'West';
    lv_direction_dict('NE') := 'North-East';
    dbms_output.put_line(lv_direction_dict('N')); -- Accessing Single Value
  --dbms_output.put_line(lv_direction_dict('E')); -- Accessing Single Value
    
        ln_index := lv_direction_dict.first;

/*Iteration*/
    WHILE ln_index IS NOT NULL LOOP
        dbms_output.put_line(ln_index
                             || ':'
                             || lv_direction_dict(ln_index));
        ln_index := lv_direction_dict.next(ln_index);
    END LOOP;

    dbms_output.put_line('*************************************************'); 
    /* TABLE OF VARCHAR2(100) INDEX BY PLS_INTEGER */
    
        lv_error_code_dict(100) := 'Continue';
    lv_error_code_dict(200) := 'Ok';
    lv_error_code_dict(400) := 'Non-Authorized';
    lv_error_code_dict(203) := 'Bad Request';
    dbms_output.put_line('Error Code 200 Description :' || lv_error_code_dict(200)); -- Accessing Signle Value
        dbms_output.put_line('Error Code 400 Description :' ||
    lv_error_code_dict(400)); -- Accessing Signle Value
    
    /* TABLE OF Composite Datatype INDEX BY PLS_INTEGER */
        dbms_output.put_line('*************************************************');
    lv_states(1).state_code := 'JK';
    lv_states(1).state_name := 'Jammu & Kashmir';
    lv_states(2).state_code := 'HP';
    lv_states(2).state_name := 'Himachal Pradesh';
    lv_states(3).state_code := 'PB';
    lv_states(3).state_name := 'Punjab';
    lv_states(7).state_code := 'DL';
    lv_states(7).state_name := 'Delhi';
    lv_states(9).state_code := 'UP';
    lv_states(9).state_name := 'Uttar Pradesh';
    lv_states(29).state_code := 'KA';
    lv_states(29).state_name := 'Karnataka';
    lv_states(32).state_code := 'KL';
    lv_states(32).state_name := 'Kerala';

    FOR i IN 1..37 LOOP
        BEGIN
            dbms_output.put_line(lv_states(i).state_code
                                 || ':'
                                 || lv_states(i).state_name);

        EXCEPTION
            WHEN OTHERS THEN
                NULL;--key not available
            END;
    END LOOP;

END;
/

Output:

GitHub Link : https://github.com/shobhit-singh/PLSQL-Programs/blob/master/README.md

Referencehttps://docs.oracle.com/cd/A97630_01/appdev.920/a96624/05_colls.htm

Thanks!

Happy Learning! Your feedback would be appreciated!

PL/SQL VARRAY

  • Array in other languages – VARRAY in PL/SQL
  • Collection of items of same datatype.
  • When defining a VARRAY type, need to specify its maximum size. So upper bound is fixed.
  • Subscript is integer (i.e. index) starts from 1
  • VARRAY is always dense (consecutive subscript). You cannot delete an item in middle, but we can trim elements from end.
  • VARRAY is preferred when no. of elements known & accessed using sequence i.e. index.

VArray Example:

TYPE va_int_type IS VARRAY(7) OF NUMBER;
TYPE va_int_type IS VARRAY(7) OF VARCHAR2(100);
Index1234567
Value21344445777899

You cannot add elements after 7th index. As upper bound is fixed at the time of array creation. You can access element using index like A[2]

Please refer below GitHub code for more details.

VArray of Composite Datatype:

CREATE TYPE emails AS OBJECT (
    email_id       VARCHAR2(100),
    email_type     VARCHAR2(100),
    primary_email  CHAR(1)
);

CREATE OR REPLACE TYPE emaillist AS
    VARRAY(5) OF emails;
/

Reference: https://docs.oracle.com/cd/A97630_01/appdev.920/a96624/05_colls.htm

Thanks!

Happy Learning! Your feedback would be appreciated!

Securing Oracle Database REST APIs using BasicAuth

Securing Oracle Database REST APIs using BasicAuth

In previous blogs we have created REST APIs using SQL Developer & ORDS without any authorization for learning. These APIs are accessible without any authorization. In real world scenarios this is not the case, we have to secure our rest services APIs, so that only authorized person/application can access. Refer below links for previous blog: (without any authorization)

In this blog we will explore how we can secure our Oracle REST Services APIs for database tables using BasicAuth (username & password). Refer below video.


When you enable the schema for REST. Go to SQL Developer. Connect your schema. Right click on connection name-> Rest Services -> “Enable Rest Service”. Check the ‘Authorization required’.

Same thing you have to enable for the object level. Enable the Rest Services on the object level using the ‘Authorization required’.

You will notice some Roles & Privileges got automatically created by the REST services.

If you explore these Privileges, you will get to know that be default some pattern got restricted. It means now you cannot access the REST service url normally. You will got 401 status as pattern got protected. You need to create the user with some role. Assigned that role to these privileges in order to access the REST services. See below example protected resources i.e. URI pattern.

User – Roles – Privileges

See below reference image. How user, roles & privilege are connected. See below reference – User is assigned to roles. You can assign roles to privileges. Privileges actually protects the patterns & modules.

I have created the role API_ROLE & assigned to privileges for Customer Table.

###Creating User with role "API_ROLE"
cd C:\ords20\ords-20.2.0.178.1804
java -jar ords.war user api_user "API_ROLE"
Check here user & roles in credential files.

User can access the APIs using BasicAuth (username & password) if its role is assigned to right privileges.

Accessing the protecting REST service without any authorization keys.

Accessing the REST Service with BasicAuth (username & password).

References: https://www.thatjeffsmith.com/archive/2018/10/ords-the-easy-way-to-protect-all-services-for-a-rest-enabled-schema/


Thanks!

Happy Learning! Your feedback would be appreciated!

Calling Oracle Database REST APIs using Python

Calling Oracle Database REST APIs using Python

In previous blog we have seen how we can enable REST Services in database schema using ORDS. Also we have created REST API using GET,POST & DELETE Method. Oracle Rest Data Services (ORDS) enable REST interface for the Oracle Database, so that you can create RESTfull APIs that uses HTTP/HTTPS requests to GET, PUT, POST & DELETE resource in the database table.

Refer below blogs for REST Service & APIs setup.

In this blog we will call Oracle Database REST APIs using Python.


REST API 1: For retrieving customer email based on text pattern (GET Method)

import requests
import json

url = "http://localhost:8080/ords/customerorders/search/adam"
req = requests.get(url)
print('Response code received: {code} '.format(code=req.status_code))
if req.status_code == 200:
    req_text_dict = json.loads(req.text)
    for i in req_text_dict['items']:
        print(i)
else:
    print("Some issue in API")

REST API 2: For retrieving orders based on customer email & status (GET Method)

import requests
import json

url = "http://localhost:8080/ords/customerorders/serachorder/orders/"
payload = (('CUSTOMER_ID', 272), ('ORDER_STATUS', "CANCELLED"))
req = requests.get(url, params=payload)

print('Response code received: {code} '.format(code=req.status_code))
if req.status_code == 200:
    req_text_dict = json.loads(req.text)
    for i in req_text_dict['items']:
        print(i)
else:
    print("Some issue in API")

REST API 3: For creating new customer entry (PUT Method)

import requests
import json

url = "http://localhost:8080/ords/customerorders/customer/addcust"
payload = (('EMAIL_ADDRESS', "devuser1@test.com"), ('FULL_NAME', "DevUser1"))
req = requests.post(url, params=payload)
print('Response code received: {code} '.format(code=req.status_code))
if req.status_code == 200:
    req_text_dict = json.loads(req.text)
    print(req_text_dict)
else:
    print("Some issue in API")

REST API 4: For deleting customer entry based using email id (DELETE Method)

import requests
import json

url = "http://localhost:8080/ords/customerorders/customer/addcust"
payload = ('EMAIL_ADDRESS', "devuser1@test.com")
req = requests.delete(url, data=json.dumps(payload))
print('Response code received: {code} '.format(code=req.status_code))
if req.status_code == 200:
    req_text_dict = json.loads(req.text)
    print(req_text_dict)
else:
    print("Some issue in API")

Schema Used: Customer-Orders Sample Schema | Oracle 12c

Thanks!

Happy Learning! Your feedback would be appreciated!

Building REST APIs | SQL Developer | POST & DELETE

Building REST APIs | SQL Developer | POST & DELETE

In previous blog we have seen how we can enable REST services in database schema using ORDS. Also we have created RESTfull API to get the customer details.

Previous Blog: Building REST APIs using SQL Developer & ORDS

In this blog we will build the APIs – POST Method to insert a record & Delete Method – delete record in database using REST Services.


Building RESTfull API – POST Method

Check the connection: Go to Rest Development Tab & Click on connect.

Step 1: Create New Module

Provide the module name & URI prefix. Check the Publish check box. Pagination is set to 5 for testing purpose. Click on next.

Step 2: Provide URI Pattern here. Click on next.

Step 3: Select the method handler as ‘POST

Open the POST method, go to SQL Worksheet. Enter the PL/SQL Block.

DECLARE
ln_cust_id CUSTOMERS.CUSTOMER_ID%TYPE;
BEGIN
Insert into CUSTOMERS (EMAIL_ADDRESS,FULL_NAME) values (:EMAIL_ADDRESS,:FULL_NAME)
RETURNING CUSTOMER_ID INTO ln_cust_id;
commit;
:string_out := 'Record Inserted. Note Customer Id:'|| ln_cust_id ;
 EXCEPTION
  WHEN OTHERS THEN
   :string_out := 'Something is missing!';
   :status := 400;
END;

Setup Parameters:

Adding the Input & Output parameters required for the POST Method.

Checking the details here:

Upload Module

Module is uploaded. Now test the API to post the customer details.

Testing Rest API

Providing input parameters as EMAIL_ADDRESS & FULL_NAME. Check on send.

Customer got created.


Building RESTfull API – Delete Method

Create a new handler in existing module.

Add handler like this in existing module.

After creating the handler, open the Delete handler & edit the SQL Worksheet.

DECLARE
ln_cust_id CUSTOMERS.CUSTOMER_ID%TYPE;
BEGIN
DELETE FROM CUSTOMERS WHERE upper(EMAIL_ADDRESS) = upper(:EMAIL_ADDRESS)
RETURNING CUSTOMER_ID INTO ln_cust_id;
commit;
:string_out := 'Record Deleted. Customer Email:'|| ln_cust_id ;
 EXCEPTION
  WHEN OTHERS THEN
   :string_out := 'Something is missing!';
    :status := 400;
END;

Setup Parameters

Adding the Input & Output parameters required for the Delete Method.

Testing Rest API

Records got deleted from the database table.


Thanks!

Happy Learning! Your feedback would be appreciated!

Building REST APIs using SQL Developer & ORDS | GET

Building REST APIs using SQL Developer & ORDS | GET

In this blog we will explore how we can create REST APIs for database tables using Oracle SQL Developer & Oracle Rest Data Services (ORDS). Also we are going to test those APIs using Postman.

We will create APIs so that we can GET some data from database table, POST some data in database table i.e. Inserting rows & DELETE Method for deleting record.

ORDS enable REST interface for the Oracle Database, so that you can create RESTfull APIs that uses HTTP/HTTPS requests to GET, PUT, POST & DELETE resource in the database table.


Prerequisite

Step 1: You can install the ORDS in three different mode like Standalone, Apache Tomcat or using Oracle Weblogic Server.

I have already installed the ORDS – 20.2 running on Apache tomcat (localhost:8080) server as a web listener for my Oracle Apex. Check this blog for Apex & ORDS Install: Oracle Apex 20.1 Installation. Apex is not pre-requisite for the ORDS. Refer complete documentation here for system requirement & installation : Link

Make sure your ords is up & running.

Step 2: Created one developer user with the role “SQL Developer”

Step 3: Setup/Enable sample schema in database. Enabled it for REST. I’m using Customer-Orders Sample Schema | Oracle 12c in this blog. Database 12c Pluggable.

Steps – Enable Rest Service – Schema

Go to SQL Developer. Connect your schema. Right click on connection name-> Rest Services -> “Enable Rest Service”.

Provide the alias name for your schema. In this blog for simplicity as of now, we are not setting up the authorization. Click on “Enable Schema”

Click on next & you can see the SQL for enabling schema. After that finish.

DECLARE
  PRAGMA AUTONOMOUS_TRANSACTION;
BEGIN

    ORDS.ENABLE_SCHEMA(p_enabled => TRUE,
                       p_schema => 'CO',
                       p_url_mapping_type => 'BASE_PATH',
                       p_url_mapping_pattern => 'customerorders',
                       p_auto_rest_auth => FALSE);

    commit;

END;

Step 4: Identify individual database tables on which you want to build RESTfull APIs. Enable the Rest Services on the object level. See below one sample example.

Go to SQL Developer. CO schema connected. Right Click on table name-> “Enable Rest Service”. For simplicity as of now not setting up the authorization. Click on “Enable Object”

Provide table alias name: If you want to access with some other name.

Click on next & you can see the SQL also. After that finish.

DECLARE
  PRAGMA AUTONOMOUS_TRANSACTION;
BEGIN

    ORDS.ENABLE_OBJECT(p_enabled => TRUE,
                       p_schema => 'CO',
                       p_object => 'CUSTOMERS',
                       p_object_type => 'TABLE',
                       p_object_alias => 'customers',
                       p_auto_rest_auth => FALSE);

    commit;

END;
Now you can access the table using the Rest Services

I have enabled the “Rest Services” for below tables in the Customer Order Schema. As I’m going to build the APIs using all these tables in my CO schema.

select * from customers;
select * from orders;
select * from order_items;
select * from products;

Exploring REST Services

For example here is my customers table in CO schema, schema alias customerorders provided in Step 3.

URL: <host>:<port>/ords/<schema-alias>/<object-alias>

Customer Table

Now try to access the REST service url giving details like schema & object name.

Get Data: http://localhost:8080/ords/customerorders/customers/

Below of this JSON output, there are links for next set of data, as limit is 25.

Metadata http://localhost:8080/ords/customerorders/metadata-catalog/customers/

Getting information for single customer: Customer Id = 306

http://localhost:8080/ords/customerorders/customers/306


Building RESTfull API – GET Method

Go to SQL Developer. Click on View. Enable Development tab.

Go to Rest Development Tab & Click on connect.

Create the RESTfull services connection – Using SQL Developer. Provide username & password created in the Step 2.

After successfully login, you can validate the REST Data Services.

Connection setup is done. Lets build our first API.

Requirement: Let say we want to build API, to retrieve customer name & email whose name starts with some text provided at runtime. Like below SQL:

Step 1: Lets build GET Method API. Create ‘New Module’

Provide the module name & prefix for your URI. Check the Publish check box. Pagination is set to 5 for testing purpose. Click on next.

Step 2: Provide URI Pattern here. Click on next.

Step 3: Select Method Handler: GET

Click on Finish.

Step 4: Change the SQL Query. Open the Method.

Execute the SQL to test.

Upload Module.

Module is uploaded. Now test the API to get the customer details based on the name. You can get the details in this tab.

Example 1: Searching users whose name starts with san

URL: http://localhost:8080/ords/customerorders/search/san

Example 2: Searching users whose name starts with adam

URL: http://localhost:8080/ords/customerorders/search/adam


Building RESTfull API – Multiple Parameter – GET

Here is the order table. Let say we want a API which can fetch orders based on customer id & status. See below sample SQL for reference.

Follow the same procedure as we have done above API for name search. Create new module provide all details. Edit the GET method & provide the query.

Setup Parameters

Adding the Input & Output parameters required for the GET Method.

API: http://localhost:8080/ords/customerorders/serachorder/orders/

Testing Rest API

Let see first data. For customer 272 we have multiple orders & status.

Example 1: Get COMPLETE Orders for customer 272

Example 2: Get REFUNDED Orders for customer 272

Refer this blog for POST & DELETE Method: Building REST APIs | SQL Developer | POST & DELETE

Testing APIs using Python: Calling Oracle Database REST APIs using Python

Securing REST API: Securing Oracle Database REST APIs using BasicAuth


Tools & Software used:

  • SQL Developer : Version 20.2.0.175
  • ORDS: select ords.installed_version from dual — 20.2.0.r1781804
  • Chrome – Postman & JSON Formatter
  • Database : 12c Pluggable Database

References:

Thanks!

Happy Learning! Your feedback would be appreciated!

Oracle Apex | Create Workspace & Developer Users

Oracle Apex | Create Workspace & Developer Users

In previous blog we have covered how we can install Apex 20.1 using Oracle 12c Database & ORDS. Refer Oracle Apex 20.1 Installation

In the blog we will see how we can create apex workspace using the Admin User – Administrator Services. Also we are going to create developer user & try to login apex workspace using developer user.

Apex Workspace enable users to create application quickly using low code development approach. It also enable you to manage, scale & deploy apex application in very fast and easy manner. One apex instance can have multiple workspace.

Instance Admin can manage workspace, schema & other developer users etc. Please refer Oracle Documentation Link for more details.

Apex Workspace Home Page

Refer below video for workspace & developer user creation on Apex 20.1


Thanks!

Happy Learning! Your feedback would be appreciated!

Oracle Apex 20.1 Installation

Oracle Apex 20.1 Installation

In this blog we are going to explore the Apex 20.1 Installation on Oracle 12 Pluggable Database | Windows 10 Machine using ORDS (Web listener).

Oracle REST Data Services (ORDS) – Java EE based RESTful service.


Installation Requirement : Database Requirement/SGA PGA Memory/Web Listener/etc. Please refer Oracle Doc Link

In this blog we are going to install ā’pěks using Oracle 12c Database Pluggable along with ORDS as web listener.

Apex Installation Steps:

Download Apex 20.1 & Unzip: Oracle Download Link

Select your installation type. Full Development or Runtime. Based on the installation type: Start the installation. In this blog we are going to setup full development environment. Installation Guide Oracle Link

Step 1. Open command prompt “Run as administrator” . Change directory where all apex scripts are present in the unzipped location of apex (~\apex_20.1_en\apex). Login database where you want to install. Login using sys as sysdba

Execute this script after providing table space names and image path :

@apexins.sql <tablespace_apex> <tablespace_files> <tablespace_temp> images

Step 2. Execute this script, which enables you to create your Instance Administrator account. You have to provide administrator name, email & strong password with punctuation.

@apxchpwd.sql

Step 3. Setting up APEX_PUBLIC_USER

ALTER USER APEX_PUBLIC_USER ACCOUNT UNLOCK;
ALTER USER APEX_PUBLIC_USER IDENTIFIED BY <PASSWORD>;

Step 4. Configure RESTfull Services. Here we need to provide password for users : APEX_LISTENER & APEX_REST_PUBLIC_USER

@apex_rest_config.sql

Here Apex Installation is done. Just check schema created by the apex installation. Next step is to setup web listener.   

  • select * from all_users where username like ‘%APEX%’ ;
  • select * from all_users where username like ‘%FLOWS%’ ;

Refer this video for Apex Installation :

ORDS Installation:

Oracle REST Data Services (ORDS) – Java EE based RESTful service which is used to replace Oracle HTTP server and mod_plsql. Download ORDS: Link

In this blog we are going to setup the ORDS using Tomcat. You have other options also like standalone & weblogic. Please refer Installation Guide: Link

Apache Tomcat Download: https://tomcat.apache.org/download-90.cgi

Pretty much straight forward installation. After installation is completed see below steps to validate. Check services : win + r -> services.msc -> Check Apache Tomcat 9 Service. It should be running. Open browser & hit: http://localhost:8080/ . You will see Apache page i.e. Apache Tomcat is up & running.

ORDS Installation Steps

Step 1. Check these schema properly able to access or not. Remember the passwords. In next steps we will provide passwords of these users as parameter.

  • APEX_PUBLIC_USER
  • APEX_LISTENER
  • APEX_REST_PUBLIC_USER
  • SYS AS SYSDBA

Step 2. Unzip ords download folder some where like C:\ords\ords-19.2.0.199.1647. Created conf folder to hold ords configuration : C:\ords\conf

Go and edit : C:\ords\ords-19.2.0.199.1647\params\ords_params.properties. You have to provide all details of your database & passwords of apex users. See below sample my param file.

db.hostname=localhost
db.port=1521
db.servicename=ORCLPDB
db.username=APEX_PUBLIC_USER
db.password=Welcome123
migrate.apex.rest=false
plsql.gateway.add=true
rest.services.apex.add=true
rest.services.ords.add=true
schema.tablespace.default=APEX
schema.tablespace.temp=TEMP
standalone.mode=false
user.apex.listener.password=Welcome#123
user.apex.restpublic.password=Welcome#123
user.public.password=Welcome#123
user.tablespace.default=APEX
user.tablespace.temp=TEMP
sys.user=SYS
sys.password=om
restEnabledSql.active=true
feature.sdw=true
database.api.enabled=true

Step 3. Change directory where ords.war is present & run below command

java -jar ords.war configdir C:\ords\conf

Step 4. Install Ords using : java -jar ords.war

After installation validate ords using: java -jar ords.war validate

Step 5. This step is depends on the installation type as here we have used Tomcat Apache. So we have do the final steps. Refer installation guide for other installation type.

  • Check the tomcat installation directory like : C:\Program Files\Apache Software Foundation\Tomcat 9.0\webapps
  • Copy images from apex download folder (~\Downloads\apex_20.1_en\apex\images) to tomcat (~\webapps\i)
  • Copy ords.war file from ords download folder (~\ords-19.2.0.199.1647\ords.war) to tomcat webapps (~\webapps).
  • Check Apex. http://localhost:8080/ords

Refer this video for ORDS installation:

Create Workspace & Start working on low-code development of application.

Oracle Apex | Create Workspace & Developer Users


Thanks!

Happy Learning! Your feedback would be appreciated!

Oracle Autonomous Database

Oracle Autonomous Database – Machine learning driven cloud-based database. Fully Automated – Self driving, Self-securing & Self-repairing. As a end-user we just have to focus on our data/business logic etc.
Available for both types of workloads Transaction Processing or Data Warehouse in Shared/Dedicated Exadata Infrastructure.

In this blog we will explore the basics of Oracle Autonomous Database (ADB).


Workloads Types

Autonomous Data Warehouse (ADW)

  • Best Suited for Analytics workloads, where data not changing too frequently. Like OLAP Systems
  • Data Warehouse, Data Mart, Data Lakes & Business Intelligence etc.
  • When your data resides is mainly summarized & aggregated form
  • When you have Massive datasets for Machine Learning Testing

Autonomous Transaction Processing (ATP)

  • Best suited for Transnational system, where data changing frequently. Like OLTP Systems
  • When you have mixed workloads (OLTP + OLAP) – Hybrid Load.
  • Mainly suited for batch processing & reporting
  • ATP suited for Application Development & Real time analytics

Features of ADB:

  • Self Driving:
    • Rapid Provisioning, Self Scaling (Upto 3x of base OCPU) – No Downtime
    • Automatic Tuning & Indexing. No need to create by yourself.
    • Automatic stats gather, user can also do manually.
    • Hints disabled by default in ADW.
    • Self Tuning – Index, Materialized Views, Partition, Compression – Not Recommend in ADB.
    • Automated Backup – 60 days retention default. (For Dedicated ADB User can control retention days : 7,15,30,60)
    • Automatic Patching in Shared Hosting. Patching can be controlled way in dedicated.
  • Self Securing:
    • Only authenticated users/app allow to access data in ADB
    • Connection used certificate based authentication & SSL (Secure Socket Layer)
    • Certificate based authentication present at both sides client & server
    • Default Encryption for data at rest – Transparent Data Encryption (TDE). For Backups also data is encrypted.
    • Encryption for data at motion – Transport Layer Security (TLS v1.2) by default. User can select other option like Oracle Native Network Encryption
    • Admin is default database user and only privileged user. There is no sys, sysadmin or system users in ADB.
    • In ADB Oracle is responsible for Platform security, Patch & Upgrades. Data encryption by default.
    • Customer Responsibility : Security assessment, sensitive data discovery, data protection, data masking & redaction.
    • Oracle Data Safe : Free tool that provide – Sensitive data discovery, data protection, data masking, user auditing. Security Assessments.
  • Self Repairing:
    • Self Healing H/W & S/W. Automatically detect any fault & recover from it.
    • Advance ML based predictive failure capabilities
    • Detection of failures – 24*7 Monitoring
    • Pattern recognizing using ML for any problem using logs.

Deployment Choice

Shared Infrastructure

  • Sharing the infrastructure with other tenants.
  • Min Size – 1x OCPU & 1TB of storage (128 OCPU Maximum)
  • Automatic scale online

Shared Infrastructure

  • Dedicated, un-shared cloud infrastructure
  • Complete Isolation
  • More control over Infrastructure & Patching process

Main Architectural Components

Exadata Cloud Infrastructure:

  • ADB is placed on Exadata Systems hosted on OCI Data Centers
  • ADB Database storage directly attached to Exadata Systems
  • OCI Object Storage (Bucket) – used for file storage.
  • Automated backups stored on dedicated OCI storage, which cannot access by user directly.
  • Staging Files, Dump Files, External Tables are stored in Bucket.

Interfaces

  • Database actions are exposed through Cloud UI and REST APIs
    • Create/terminate/backup/restore/stop/start
    • Change – CPU or Storage
  • Monitoring – User can monitor using ‘Cloud Service Dashboard’
  • Developer – SQL Developer & Web etc.
  • ORDS – Oracle Rest Data Services

Oracle Data Visualization Desktop :

  • Analysis Tool – Light weighted
  • It can be installed on Windows & Mac OS10.
  • Offline Availability
  • No remote server required

Loading /Migrating Data to ADB

  • ORCL SQL*LOADER – Data sitting on local client.
  • ORCL DATA PUMP (impdp/expdp .DMP) Using Object Storage
  • .CSV/JSON/Parquet Files
  • External Tables

Refer DBMS_CLOUD package for more details for data loading & credentials setup.

Move data into the ADB database :

  • Data Pump – Portable way to load data in new ADB
  • Golden Gate – Replication for on-prem & non-autonomous. It has some restrictions for rowids, nested table & identity column.

Wallet Credentials:

  • Wallet is used for connecting the ADB.
  • Certificate authentication uses an encrypted key stored in a wallet on both client as well as server side.
  • Listener Port: 1522 (Standard on Shared & default on Dedicated)

Wallet contains collection of files.

  • truststore.jks
  • tnsnames.ora
  • sqlnet.ora – Connector Strings details
  • README – expiry date – 2.5 years approx
  • keystore.jks
  • ewallet.p12
  • cwallet.sso

Pre-defined Database Service

tp & tpurjent best suited for OLTP. low best suited for warehousing as high concurency.

  • tpurjent – ATP Only (Support Manual Parallelism) High concurrency & resources. For batch processing when parallel required.
  • tp – ATP Only (No Parallelism) as DOP=1. High concurrency & resources. When parallel not required
  • high (All operations parallel) All CPUs
  • medium DOP=4 limited
  • low – (No Parallelism) as DOP = 1
S.NoServiceSQL PARALLISMRESOURCESCONCURRENCY
1tpurjent (ATP)Manual12100 X CPU
2tp (ATP)18100 X CPU
3highALL CPU43
5medium421.25 X CPU
6low11100 X CPU
  • In ADW – there will be only high, medium & low.
  • In ATP – All 5 services are present.

Scaling

  • Independently scale compute (OCPU) & storage for ADB
  • Resizing occur instantly, fully online.
  • Memory, IO bandwidth, concurrency scales linearly with OCPU

Backup ADB

  • Automated backup
  • Retention period shared – 60 days
  • Retention period dedicated – 7, 15, 30, 60 days
  • Database can be restored at any point in time within retention
  • User can create manual backups also
  • Recovery can be done using Cloud Console/API – from timestamp (point in time) or using backup

Cloning ADB

Create a new database as a clone of an existing ADB.

  • Either full copy or Just Metadata depending upon requirement
  • Create clone from a live running DB instance or from a backup of ADB

Thanks!

Happy Learning! Your feedback would be appreciated!